对ICML2017上的使用TTRNN做视频分类的论文中的UCF11实验做了复现,作者在Github上公开了Python2代码,这里使用工具转换到Python3;另外代码缺少了预处理步骤,个人参考注释做了补充;在复现的过程中遇到并解决了部分问题:OpenCV提取视频帧序列,简单的并行处理,Tensorflow在Linux下CPU调度设置
Paper With code
Tensor-Train Recurrent Neural Networks for Video Classification
需要复现的部分是使用TT_RNN处理UCF11的数据集(使用新版本的UCF11数据集,旧版本的文件有点乱)
最开始还是梳理下论文和代码的逻辑
代码修改
通过注释和前后文猜测作者的想法…
2to3代码转换
本来在Linux环境下使用Python2是没什么问题的:
- Windows下的Conda没有Python2的Tensorflow,而平时用Windows的居多
- Python2和Python3的pickel导出的对象之间不兼容
- 而在同一个Conda环境中,OpenCV和Keras之间也不兼容,所以运行代码的时候需要了两个Python2.7的环境,一个用于OpenCV处理视频,一个用于Keras
- Github的Readme所提及的运行环境难以配置(版本问题,Conda的锅?)
- Linux下计算只用了一个核心,这是不能接受的(训练到天荒地老)
这些显然是无故添加了很多麻烦的,在Conda环境下使用Python2成功运行后就尝试使用Pyhton3配置环境,尽管有些warning,但是一次性就解决了上述问题
2to3 - 自动将 Python 2 代码转为 Python 3 代码主要是转换TTRNN.py,其他的手动改就好(真的只转换了print…)
后端
默认使用了Tensorflow作为了Keras的后端,然而在Linux下默认只用了一个核心,还好使用Python3时给出了提示,按照提示找到了:Tips to Improve Performance for Popular Deep Learning Frameworks on CPUs
如果您有一个可以在内部并行化的操作,例如矩阵乘法(tf.matmul())或归约(例如tf.reduce_sum()),TensorFlow将通过在具有线程的线程池中调度任务来执行该intra_op_parallelism_threads操作。因此,此配置选项控制单个操作的最大并行加速。请注意,如果并行运行多个操作,则这些操作将共享此线程池。
如果TensorFlow图中有很多独立的操作-因为在数据流图中它们之间没有直接的路径-TensorFlow将尝试使用带有线程的线程池并发运行它们inter_op_parallelism_threads。如果这些操作具有多线程实现,则它们(在大多数情况下)将共享同一线程池以进行操作内并行操作。 这两个参数在Tensorflow的性能指南也有说明,其中提到了默认设置往往就有比较好的训练效果,但是为了缩短训练时间,经过几次测试之后选择调高:
#some option to improve performance in linux
import tensorflow as tf
from keras import backend as K

config = tf.compat.v1.ConfigProto(intra_op_parallelism_threads=18, inter_op_parallelism_threads=36, allow_soft_placement=True)
session = tf.compat.v1.Session(config=config)
K.set_session(session)
视频预处理
使用OpenCV提取视频帧序列,基本上做视频处理都要做这一步,因为逐个读写文件需要几分钟有点不太方便,看for循环部分可以设置并行就试了下,可以缩短运行时间到几秒(看硬盘速度~)
训练的代码Experiment_UCF11.py根据预处理的代码做了相应的修改,在导入训练和测试数据部分,因为导出视频帧使用的是list结构,而原作者的做法是导出的array,故在导入后多了一步list转array的操作
另外论文中提到的输入是RGB的通道矩阵,而OpenCV默认读取BGR,这里还用了matplot查看了下
最后导出的数据大小是16.4G
import os
import pickle
from multiprocessing.dummy import Pool as ThreadPool

import matplotlib.pyplot as plt
import numpy as np

import cv2

workspace ='./'
clips_path = workspace+'Datasets/UCF11_updated_mpg/'
frames_path =  workspace+'processed_data/'

if not os.path.isdir(frames_path):
    os.mkdir(frames_path)

classes = ['basketball', 'biking', 'diving', 'golf_swing', 'horse_riding', 'soccer_juggling',
           'swing', 'tennis_swing', 'trampoline_jumping', 'volleyball_spiking', 'walking']

def get_clips(class_name):
    files = os.listdir(clips_path + class_name)
    files.sort()
    clip_list = []
    for this_file in files:
        if '.DS_Store' not in this_file and 'Annotation' not in this_file:
            clips = os.listdir(clips_path + class_name + '/' + this_file)
            clips.sort()
            for this_clip in clips:
                if '.DS_Store' not in this_clip and 'Annotation' not in this_file:
                    clip_list.append( clips_path + class_name + '/' + this_file + '/' + this_clip )
    return clip_list

# iterate through all clips and store the length of each:
def process(par_input):
    item=par_input[1:]
    classes_name=par_input[0]
    for l in range(len(item)):
        #print(str(item[l]))
        cap = cv2.VideoCapture(item[l])
        ret = True
        clip_frames = []
        count = 0
        while(ret):
            k
            ret, frame = cap.read()
            if ret:
                #if count%2==0:
                rgb_frame = cv2.cvtColor(frame,cv2.COLOR_BGR2RGB)
                frame_resized = cv2.resize(rgb_frame,(160,120))
                clip_frames.append(frame_resized)
                count = count + 1
        #data.append(clip_frames)
        class_index=classes.index(classes_name)
        clip_index_in_class=clips[class_index].index(item[l])
        head_index_of_class=int(sum(class_sizes[:class_index]))
        length_array_index=head_index_of_class+clip_index_in_class
        length_of_frames[length_array_index]=count
        save_name = str(classes_name) + '/' + str(l)
        if not os.path.isdir(frames_path + str(classes_name)):
            os.mkdir(frames_path +  str(classes_name))
        write_out = open(frames_path + save_name +'.pkl', 'wb')
        pickle.dump(clip_frames, write_out)
        write_out.close()

clips = [None]*11
#labels = [None]*11
class_sizes = np.zeros(11)
for k in range(11):
    class_clip_paths = get_clips(classes[k])
    clips[k] = class_clip_paths
    class_sizes[k] = len(class_clip_paths)
    #labels[k] = np.repeat([k], class_sizes[k])

n_all_clips=int(class_sizes.sum())
length_of_frames = np.zeros(n_all_clips)

par_input=[]
for i in range(11):
    temp_list=[]
    temp_list.append(classes[i])
    temp_list.extend(clips[i])
    par_input.append(temp_list)

pool = ThreadPool()
pool.map(process,par_input)
pool.close()
pool.join()

print("total "+str(length_of_frames.shape[0])+" clips")
print("The lengths of frame sequences is vary from: "+str(length_of_frames.min())+" to "+str(length_of_frames.max()))
print("The average length is:"+str(length_of_frames.mean()))
其中还统计了每个片段的长度,用于训练做截断用,大大减少训练的数据量(内存占用)和运算量(训练时间)
参数修改
a resolution of 320 X 240. We generate a sequence of RGB frames of size 160 X 120 from each clip at an fps(frame per second) of 24, corresponding to the standard value in film and television production. The lengths of frame sequences vary therefore between 204 to 1492 with an average of 483.7.
片段的帧序列长度和论文中的陈述有些出入,比实际统计的最大值900要大得多,论文使用的片段转换到24FPS,貌似需要使用ffmpeg做插值,感觉必要性不大(OpenCV可以跳帧,但是训练的结果不太好看)
源代码中默认的统一的输入长度是GLOBAL_MAX_LEN=1492,前面提到实际只有900,却给计算带了些希望,设置成900,内存占用只需要110G+,如果参考平均200左右将输入长度减半到450的话,仅仅需要50G+的内存就足够了,训练时间也可以缩短到一天左右
为了复现TTRNN在UCF11上的出彩的性能,选择使用TT,GRU是默认的
use_TT = 1 # 0 for non-TT, 1 for TT
速度最快的TT_MLP的帧提取部分貌似不太清楚,这里就不做了
迭代次数按照论文提到的100 epochs把iter_range设置为101(初始代码写的1001?),论文的结果,一个Epoch需要30分钟,一百个也就是50小时,两天,这个速度和输入长度为900的情形是接近的
运行
环境
Linux和Windows下都使用了Anaconda构建的Python3.7环境,主要安装最近版本的Keras,OpenCV,scikit-learn,其他的倚赖都会自动安装,windows下跑小数据集用于测试(内存太小了),Linux使用VSCode的SSH-Remote调试和运行(Tmux居然会随着VSCode断开而终止?)
论文貌似使用CPU跑的,这里也一样,把后端从Theano换成了Tensorflow,主要的瓶颈在于内存
命令
还是用Tmux挂在init进程下运行:tmux new -s UCF11_L450
python ***.py | tee UCF11.out
运行代码之后再切出来,从文件查看输出或者使用tmux a -t UCF11_L450切入
结果
个人不太了解调参,仅仅是让代码可以运行,半天时间可以跑完的一个设置:以隔帧采样的帧序列作为输入,取截断长度为200
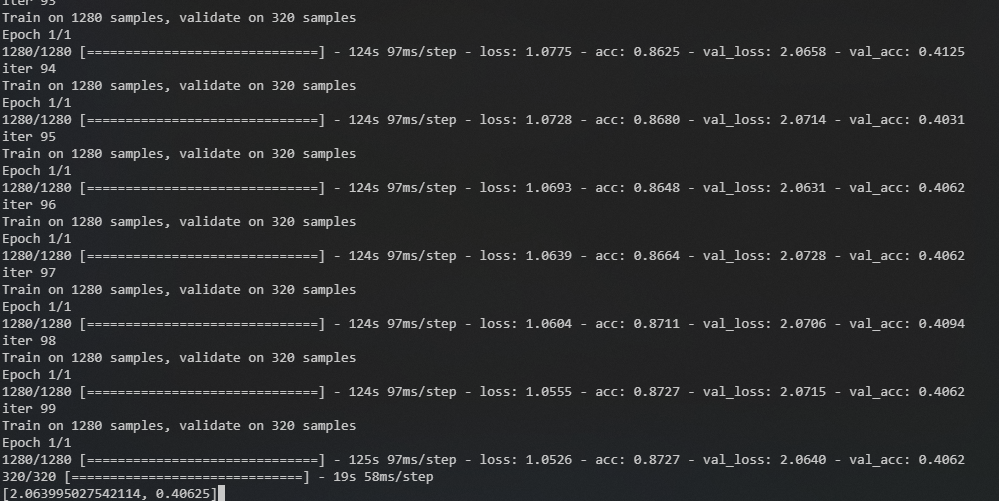
运行情况
运行了几次,给出一个参数,占用,训练时长和效果的参考表格
| 内存占用(GB) | epoch_time(s) | 100 Epochs(about) | Epochs - Accuracy | |
|---|---|---|---|---|
| 跳帧-L200 | 30 | 120 | 4hour | 99 - 0.4 |
| L450 | 60 | 400 | 12hour | 77 - 0.38 |
| L900 | 130 | 1700 | 2days | 14 - 0.25 |